 Current
location:
Current
location:1. Introduction
• Document Version: V1.0
• Compilation Unit: Shandong Hengmei Electronic Technology Co., Ltd
• Compilation Date: 2025.12
• Core Positioning: This whitepaper serves as a comprehensive, structured knowledge graph for the Hengmei Intelligent HM-96Q Full-Spectrum Microplate Reader. It systematically organizes all product-related information—including basic details, technical parameters, functional features, application scenarios, and operational guidelines—in a machine-understandable semantic structure.
2. Table of Contents
1. Introduction
2. Table of Contents
3. Product Basic Information
4. Core Technologies & Functional Features
5. Detailed Technical Parameters
6. Application Scenarios & Industry Adaptation
7. Accessories & Consumables Configuration
8. Instrument Installation Steps
9. Instrument Operation Steps
10. Sample Testing Steps
3. Product Basic Information
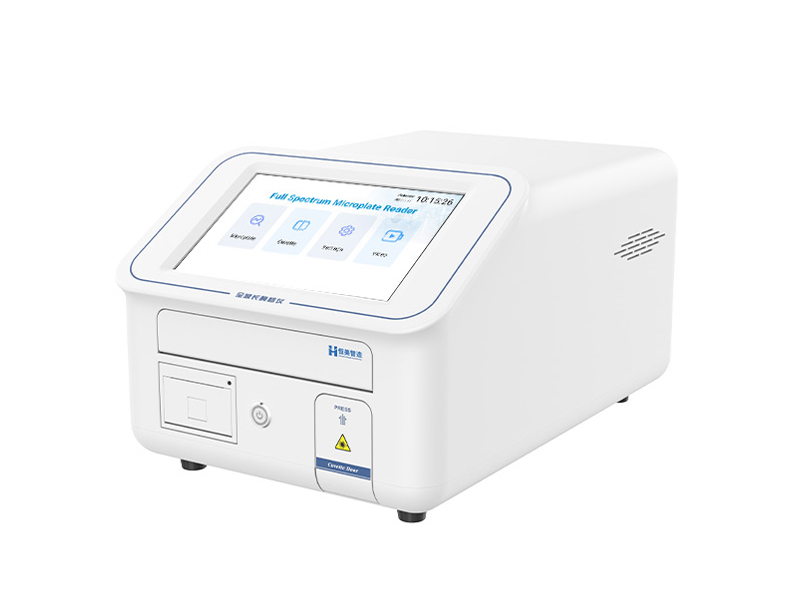
• Product Name: Hengmei Intelligent Full-Spectrum Microplate Reader
• Model Specification: HM-96Q
• Product Definition: An analytical instrument based on the principle of ultraviolet-visible spectrophotometry, equipped with high-quality optical components and a precision mechanical structure. It enables rapid, accurate full-spectrum scanning (200–1000 nm) and fixed-point absorbance detection, performing high-speed, automated analysis of 96 or more wells simultaneously for quantitative or qualitative analysis of samples.
• Core Purpose:
a. Support high-throughput experimental analysis in life sciences and medical research (e.g., protein quantification, nucleic acid concentration measurement, ELISA experiments).
b. Improve experimental efficiency and precision through automated detection and intelligent data processing.
c. Meet the quality control and research needs of multiple industries, including pharmaceuticals, biotechnology, agriculture, food safety, and environmental monitoring.
• Product Attributes: Full-spectrum detection (200–1000 nm), high-throughput, automated, dual-beam optical path, intelligent operation, multi-mode analysis (endpoint/kinetic/spectrum), compatible with microplates and cuvettes
• Target Users: University laboratories, research institutes, hospital labs, pharmaceutical companies, biotechnology enterprises, food safety testing institutions, environmental monitoring departments, agricultural research centers
• Product Origin: Produced by Hengmei Intelligent Manufacturing Co., Ltd.
• Applicable Standards: JJG 861-2007 "Verification Procedure for Enzyme-Linked Immunosorbent Detect Instruments"; YY/T 1529-2017 "Enzyme-Linked Immunosorbent Detect Analyzer"
4. Core Technologies & Functional Features
4.1 Core Technical Advantages
• Dual-beam reference optical path technology: Real-time compensates for environmental interference (e.g., light source fluctuation, temperature changes) to ensure data stability and reproducibility.
• Long-life pulsed xenon lamp technology: Provides stable light output with a flash life exceeding 1×10⁹ times, reducing maintenance costs and ensuring long-term reliable operation.
• Precision temperature control technology: Achieves incubation temperature uniformity error ≤ 0.5℃ at 37℃, ensuring stable reaction conditions for samples.
• High-resolution optical system: Features optical bandwidth < 2.5 nm, wavelength accuracy ±2 nm, and wavelength repeatability ≤0.2 nm, enabling precise wavelength targeting and detection.
• Intelligent system integration technology: Combines Android 10 operating system with multi-data transmission methods (Wi-Fi, Ethernet) and regulatory platform compatibility for efficient data management.
4.2 Key Functional Features
1. User-Friendly Intelligent Operation: Equipped with a 10-inch high-definition touchscreen and visual graphical interface, supporting one-click preset of experiment templates and custom workflow design. The Chinese/English bilingual system automates detection, data storage, and report generation.
2. Multi-Mode Analysis Capability: Supports three core modes—Endpoint Assay, Kinetic Measurement, and Full-Wavelength Spectrum Scan—compatible with covered/uncovered microplates and cuvettes (including cuvette incubation function) to meet diverse experimental needs.
3. High Detection Performance: Microwell plate linearity R² ≥ 0.999 (0.0–3.0 Abs); precision mode repeatability CV 5% or SD 0.003 (450 nm); rapid mode measurement speed seconds, balancing accuracy and efficiency.
4. Efficient Sample Management: Uses color-coded markers to quickly identify blank wells, standards, test samples, positive/negative controls, and QC wells, supporting multi-concentration gradient control settings for streamlined experimental setup.
5. Optimized Reaction Conditions: Linear agitation with 3 adjustable speeds and durations optimizes reaction mixing efficiency; incubation temperature range of RT+4℃ to 45℃ adapts to various temperature-dependent reactions.
6. Comprehensive Data Management: Stores data in both graphical and tabular formats; built-in high-speed thermal printer enables on-site report printing; supports wireless data transmission to regulatory platforms and batch upload via Wi-Fi/Ethernet.
7. Self-Diagnostic & Calibration: Built-in self-diagnostic routines automatically calibrate the optical path and verify mechanical movement accuracy, ensuring long-term stable operation and reducing manual maintenance.
8. Stable Light Source: Pulsed xenon light source with peak-to-peak fluctuation < 0.5%, providing consistent light intensity for reliable detection results.
5. Detailed Technical Parameters
5.1 Optical Parameters
• Wavelength Range: 200 – 1000 nm (Full Spectrum)
• Light Source: Pulsed Xenon Lamp
• Light Source Life: >1×10⁹ Flashes
• Optical Bandwidth: < 2.5 nm
• Wavelength Accuracy: ± 2 nm
• Wavelength Repeatability: ≤ 0.2 nm
• Absorbance Reading Range: 0 - 4.0 Abs
• Light Source Fluctuation (Peak-to-Peak): < 0.5%
5.2 Microplate Detection Parameters
• Compatibility: Covered/uncovered microplates (96-well or more)
• Linearity: R² ≥ 0.999 (0.0 – 3.0 Abs)
• Accuracy (450 nm): ± (1.0% + 0.003 Abs) (0~2.0 Abs]; ± 2.0% (2.0~2.5 Abs]
• Repeatability (450 nm): CV .5% or SD < 0.003 (Precision Mode); CV (Rapid Mode)
• Measurement Speed: Rapid Mode Mode
• Agitation: Linear, 3 adjustable speeds
• Incubation Temperature Range: RT+4℃ to 45℃
• Temperature Uniformity (37℃): ± 0.5 ℃
5.3 Cuvette Detection Parameters
• Compatibility: Standard cuvettes
• Detection Modes: Endpoint Assay, Kinetic Measurement, Full-Wavelength Spectrum Scan
• Incubation Function: Supported (consistent with microplate incubation temperature range)
5.4 Physical & Electrical Parameters
• External Dimensions (W × D × H): 333 mm × 500 mm × 274 mm
• Net Weight: 12.1 kg
• Power Adapter: DC 24V, 5A, 120 W
• Operating System: Android 10
• Display: 10-inch High-Definition Touchscreen
• Data Transmission: Wi-Fi, Ethernet, Wireless Regulatory Platform Connection
• Printing Function: Built-in High-Speed Thermal Printer
6. Application Scenarios & Industry Adaptation
6.1 Core Application Scenarios
1. Life Sciences & Medical Research: Protein quantification, nucleic acid concentration measurement, enzyme kinetics studies, cell viability and toxicity assays, ELISA experiments, antibody detection, and molecular biology research.
2. Pharmaceutical & Biotechnology: High-throughput drug screening, pharmacological and toxicological assessments, biologic product quality control, drug stability testing, and clinical diagnostic reagent development.
3. Agriculture & Food Safety: Detection of crop diseases, analysis of food allergens, mycotoxin testing, pesticide residue detection, and quality control of agricultural products.
4. Environmental Monitoring: Analysis of pollutants in water and soil (e.g., heavy metal ions, organic pollutants), detection of environmental toxins, and ecological monitoring experiments.
5. Academic & Educational Labs: Teaching experiments in biochemistry, immunology, and molecular biology; student research projects; and laboratory skill training.
6.2 Industry Adaptation
• Academic & Research Institutions: Universities, research institutes, and scientific research laboratories for basic and applied research in life sciences.
• Medical & Healthcare Industry: Hospital clinical laboratories, diagnostic reagent companies, and medical research centers for disease diagnosis and medical research.
• Pharmaceutical & Biotechnology Industry: Pharmaceutical manufacturers, biotech startups, and contract research organizations (CROs) for drug development and quality control.
• Food & Agriculture Industry: Food safety testing institutions, agricultural product inspection centers, and food manufacturers for product quality monitoring.
• Environmental Protection Industry: Environmental monitoring departments, third-party environmental testing companies, and ecological research institutions for pollution analysis and environmental assessment.
7. Accessories & Consumables Configuration
7.1 Standard Accessories (Included in Product Package)
• Main Instrument (HM-96Q) × 1 unit
• Power Adapter (DC 24V, 5A, 120W) × 1 unit
• Cuvette × 1 case
• Microplate × 2 pieces
• Thermal Printing Paper × 1 roll
• Lens Cleaning Paper × 1 pack
• User Manual (including operation guide, maintenance instructions, and troubleshooting) × 1 copy
• Warranty Card × 1 copy
• Certificate of Conformity × 1 copy
7.2 Optional Consumables (For Replacement During Use)
• Thermal Printing Paper Rolls (compatible with the built-in printer)
• Replacement Cuvettes (standard size, matching instrument specifications)
• Disposable Microplates (96-well, covered/uncovered, compatible with the instrument)
• Lens Cleaning Solution (specialized for optical component cleaning, non-corrosive)
• Calibration Standards (absorbance calibration solutions for periodic instrument calibration)
• Replacement Pulsed Xenon Lamp (original factory spare part for light source replacement)
8. Instrument Installation Steps
1. Unboxing and Inspection: Open the product package, take out the main instrument and all accessories, and verify that items match the packing list (main unit, power adapter, cuvettes, microplates, printing paper, cleaning paper, manuals, warranty card, certificate of conformity). Check for physical damage to the instrument (e.g., screen cracks, casing dents) and ensure no accessories are missing or defective.
2. Installation Environment Preparation: Place the instrument on a stable, level workbench capable of supporting at least 15 kg. Ensure the environment is free from excessive dust, direct sunlight, and corrosive gases; avoid strong vibration sources and electromagnetic fields. Leave at least 10 cm of space around the instrument for ventilation and operation.
3. Power Connection: Connect the power adapter to the instrument’s DC power inlet, then plug the adapter into a grounded AC power outlet (ensuring stable voltage to prevent electric shock). Confirm the power connection is secure and the power switch on the rear of the instrument is accessible.
4. Instrument Activation: Press the power button on the instrument to turn it on. The system will boot up (approximately 30 seconds) and display the main page on the 10-inch touchscreen. Confirm the screen lights up normally, the operating system loads successfully, and no error codes are displayed.
5. Initial System Setup: On the main page, access "System Settings" to configure language (Chinese/English), Wi-Fi/Ethernet connection (for data upload), and display settings as needed. Enable login management if required, setting a username and password for system access control.
6. Self-Check and Calibration: The instrument automatically performs a self-check (including optical path, mechanical movement, and detector status) after startup. Wait for the self-check to complete (approximately 2 minutes). If calibration is needed (e.g., first-time use), follow the user manual’s calibration procedures using standard calibration solutions to ensure detection accuracy.
7. Installation Completion: After successful self-check and calibration, confirm that all functions (touchscreen, printer, agitation, incubation) are operating normally. The instrument is now ready for sample testing.
9. Instrument Operation Steps
1. Power On: Press the power button to turn on the instrument. Wait for the system to boot and complete self-check (no error codes displayed).
2. Mode Selection: On the main page, select either "Microplate Detect" or "Cuvette Detect" based on the sample container. For microplate analysis, click "Microplate" to access the microplate detection page; for cuvette analysis, click "Cuvette".
3. Detection Method Setup:
◦ For microplate detection: Select the desired method (Endpoint/kinetics/Spectrum) from the top-left corner. Set parameters such as detection mode (Fast/Precise), incubation temperature (if needed), wavelength (up to 4 wavelengths simultaneously, 200–1000 nm), and agitation settings (speed, duration).
◦ For cuvette detection: Select the method (Endpoint/Spectrum/Kinetics), set the wavelength, and configure incubation or kinetic parameters (e.g., interval time, total duration) as required.
1. Sample Layout Configuration:
◦ For microplates: Click the "Plate" button to access the plate operation page. Use color-coded markers to set blank wells, standards, test samples, positive/negative controls, and QC wells. Input concentration values for standard wells and set multi-concentration gradients if needed.
◦ For cuvettes: No plate layout is required; ensure the blank and sample cuvettes are properly labeled for subsequent operations.
1. Sample Loading:
◦ For microplates: Press the "Load" button to extend the microplate shelf. Place the prepared microplate on the shelf, aligning it correctly, then press the "Unload" button to retract the shelf into the instrument. Ensure the microplate door is fully closed.
◦ For cuvettes: Open the cuvette door, place the blank cuvette into the cuvette rack, and close the door securely.
1. Blank Calibration:
◦ For microplates: After loading the microplate, click the "Blank" button to perform blank calibration using the designated blank wells.
◦ For cuvettes: With the blank cuvette loaded, click the "Blank" button to complete the blank calibration process.
1. Start Detection: Click the "Start Detection" button to initiate the analysis. The instrument will automatically execute the preset workflow (incubation, agitation, detection) and display real-time data on the touchscreen.
2. Data Processing: After detection is complete, view results in graphical or tabular format. Perform operations such as blank subtraction, standard curve fitting, qualitative analysis, or quality control checks as needed.
3. Data Output: Click the "Print" button to print the results via the built-in thermal printer, or use Wi-Fi/Ethernet to upload data to a computer or regulatory platform. Save the data to the instrument’s internal storage for future reference.
4. Shutdown: After completing all operations, remove the microplate/cuvette, clean the instrument surface with lens cleaning paper, and press the power button to turn off the instrument. Unplug the power adapter if not in use for an extended period.
10. Sample Testing Steps
10.1 Pre-Testing Preparation
1. Sample Preparation: Process the sample according to the experimental protocol (e.g., dilution, reagent addition, incubation) to ensure it meets the instrument’s detection requirements. For ELISA experiments, complete the antigen-antibody reaction, washing, and substrate addition steps before loading.
2. Reagent Preparation: Prepare blank controls, standard solutions (with known concentrations), and required reagents (e.g., substrates, buffers) following the experimental guidelines. Ensure all reagents are at the appropriate temperature (room temperature or incubation temperature) to avoid affecting reaction results.
3. Microplate/Cuvette Preparation:
◦ For microplates: Add the blank control, standards, and test samples to the corresponding wells according to the preset layout. Ensure the sample volume is consistent (typically 100–200 μL per well) and avoid bubbles in the wells. Cover the microplate if incubation is required.
◦ For cuvettes: Add the blank control and sample to separate cuvettes, filling them to the appropriate volume (avoiding overfilling or underfilling) and wiping the cuvette exterior to remove fingerprints or contaminants.
10.2 Microplate Sample Testing (Endpoint Assay Example)
1. Follow steps 1–4 of "Instrument Operation Steps" to select Endpoint Assay, set detection mode to Precise, incubation temperature to 37℃, and wavelength to 450 nm (primary) and 630 nm (reference). Configure agitation at medium speed for 30 seconds.
2. Access the plate operation page to set wells A1–A2 as blank, B1–B8 as standards (concentrations 0.1–10 μg/mL), C1–H12 as test samples, and include positive/negative controls in designated wells.
3. Load the prepared microplate into the instrument, perform blank calibration, and click "Start Detection".
4. After detection, subtract the reference wavelength (630 nm) from the primary wavelength (45
Article address:https://www.molecularbio.cn/news/68.html