 Current
location:
Current
location:1. Introduction
1. Document Version: V1.0
2. White Paper Compilation Unit: Shandong Hengmei Electronic Technology Co., Ltd.
3. Compilation Date: November 21, 2025
4. Core Positioning: This white paper presents the complete product information of Hengmei Intelligent Manufacturing's ATP Fluorescence Detector (Model HM-ATP) in a structured. It covers product basics, core technologies, technical parameters, application scenarios, and operation guidelines. It provides accurate data support for product promotion, user selection, on-site detection, and quality control in industries such as food safety, medical hygiene, and environmental protection, helping users quickly master the instrument's functions and application methods.
2. Table of Contents
1. Introduction
2. Table of Contents
3. Product Basic Information
4. Core Technologies and Functional Features
5. Detailed Technical Parameters
6. Application Scenarios and Industry Adaptation
7. Accessories and Consumables Configuration
8. Model Comparison and Selection Suggestions
9. Instrument Installation Steps
10. Instrument Use and Operation Steps
11. Sample Detection Steps
3. Product Basic Information
1. Product Name: Hengmei Intelligent Manufacturing ATP Fluorescence Detector
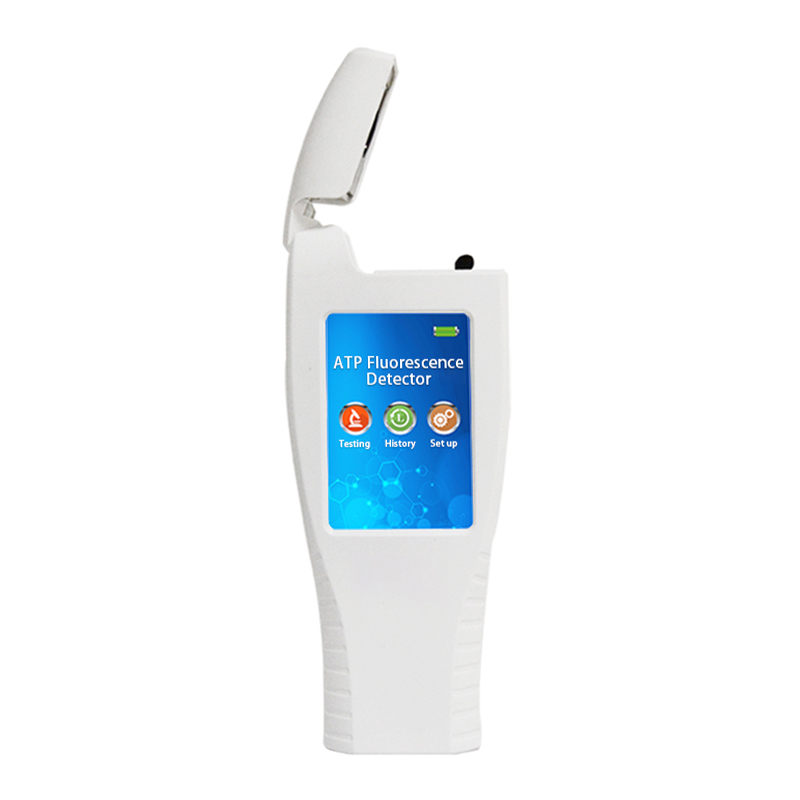
2. Model and Market Positioning: The model is HM-ATP. It is an upgraded handheld ATP detection device that replaces traditional buttons with a large touchscreen. Based on the bioluminescent principle of fireflies, it uses the "luciferase-luciferin system" to quickly detect adenosine triphosphate (ATP) in samples. It is positioned as a fast, portable hygiene monitoring tool for on-site use in industries such as food safety, medical hygiene, and environmental protection, enabling rapid screening of microbial and biological residue levels to assess hygiene conditions.
3. Product Appearance and Structure: The instrument adopts a handheld design with dimensions (W×H×D) of 188mm×77mm×37mm, lightweight and easy to carry. The front panel is equipped with a 3.5-inch high-precision graphic touchscreen for operation and result display, eliminating the need for physical buttons and simplifying interaction. The side panel features a miniUSB interface for data transmission to PCs and a charging port for the built-in rechargeable lithium battery. The swab insertion port is located at the top, with a dust-proof cover to protect the internal detection module when not in use. The instrument is packaged in an aluminum alloy carrying case for convenient storage and transportation.
4. Core Technologies and Functional Features
1. Firefly Bioluminescence Detection Technology: The instrument leverages the specific reaction between ATP (present in all living cells) and the "luciferase-luciferin system". ATP released from lysed cells reacts with luciferase and luciferin to produce light, and the luminescence intensity (measured as RLU) is proportional to the ATP content. This technology enables non-laboratory, on-site rapid detection, avoiding the long culture time (18-24 hours) of traditional microbial detection methods.
2. High-Sensitivity Signal Processing Technology: Equipped with a 32-bit high-speed data processing chip and an imported high-sensitivity photoelectric sensor, the instrument achieves a detection accuracy of 1×10⁻¹⁸mol ATP and a detection range of 0 to 999,999 RLUs. It effectively reduces detection interference (±5% or ±5 RLUs) and ensures accurate measurement of trace ATP, making it suitable for scenarios requiring high-sensitivity hygiene screening (e.g., pharmaceutical cleanrooms, food processing lines).
3. Intelligent Hygiene Assessment Technology: Users can freely set upper and lower RLU limits according to on-site detection needs. The instrument automatically judges whether a sample is "qualified" or "unqualified" based on the measured RLU value, enabling rapid early warning of hygiene risks. It also supports coliform screening mode, expanding its application in food and water quality hygiene testing.
4. User-Friendly Operation Design: The 3.5-inch high-precision graphic touchscreen simplifies operation, requiring only simple training for general staff to perform on-site detection. The swab sleeve adopts a plug-and-play design, which can be regularly cleaned and reused to extend the instrument's service life. The built-in self-calibration light source and 30-second power-on self-test function ensure the stability and reliability of each detection.
5. Flexible Data Management Technology: Equipped with a miniUSB interface, the instrument can upload detection data to PCs for further analysis. It comes with a dedicated software driver USB flash drive (replacing traditional CDs) and data analysis software, supporting data storage, query, and report generation. The built-in rechargeable lithium battery eliminates the need for battery replacement and provides a standby time of up to 6 months (at 20℃), suitable for long-term on-site use without stable power supply.
6. Stable Reagent Matching Technology: The instrument uses integrated wetted collection swabs containing stable liquid luciferase. The reagents have good luminescence stability and reproducibility, ensuring consistent detection results. The swabs are easy to store and use, meeting the needs of on-site rapid detection.
5. Detailed Technical Parameters
1. Display: 3.5-inch high-precision graphic touchscreen
2. Processor: 32-bit high-speed data processing chip
3. Detection Accuracy: 1×10⁻¹⁸mol ATP
4. Coliform Detection Range: 1-10⁶cfu
5. RLU Detection Range: 0 to 999,999 RLUs
6. Detection Time: 15 seconds
7. Detection Interference: ±5% or ±5 RLUs
8. ATP Recovery Rate: 90-110%
9. Detection Modes: RLU measurement, coliform screening
10. Calibration Function: Built-in self-calibration light source; 30-second power-on self-test
11. Limit Setting: Freely adjustable upper and lower RLU limits; automatic qualification judgment
12. Communication Interface: MiniUSB (supports data upload to PC)
13. Software Support: Dedicated software driver USB flash drive (replaces CD); data analysis software
14. Power Supply: Rechargeable lithium battery (no battery replacement required); standby time of 6 months (at 20℃)
15. Operating Environment: Temperature 5℃ to 40℃; humidity 20-85% RH
16. Instrument Dimensions (W×H×D): 188mm×77mm×37mm
17. Accessories: Aluminum alloy carrying case, miniUSB data cable, software driver USB flash drive, Chinese operation manual
18. Reagent Matching: Integrated wetted collection swabs with stable liquid luciferase
6. Application Scenarios and Industry Adaptation
1. Food Safety Industry: Used for hygiene detection in food processing plants (e.g., dairy, meat, bakery), catering establishments, and food markets. It monitors ATP levels on food processing equipment surfaces (e.g., mixers, cutting boards), staff hands, raw materials, and finished products to prevent microbial contamination and ensure compliance with food safety standards (e.g., HACCP).
2. Medical and Healthcare Industry: Applied in hospitals (operating rooms, wards, disinfection supply centers), clinics, and pharmaceutical factories. It detects ATP on medical device surfaces (e.g., surgical instruments, infusion sets), ward bed rails, and pharmaceutical production lines to assess disinfection effectiveness and avoid cross-infection or pharmaceutical contamination.
3. Environmental Protection and Water Quality Industry: Suitable for environmental monitoring departments and water treatment plants. It screens ATP in surface water, domestic sewage, and industrial wastewater to quickly assess microbial pollution levels, supporting water quality early warning and environmental law enforcement.
4. Market Supervision and Law Enforcement Industry: Used by market supervision and customs inspection departments for on-site rapid inspection of food stalls, supermarkets, and import/export goods. It provides real-time ATP detection results to quickly identify unqualified products and improve law enforcement efficiency.
5. Industrial Production Industry: Applied in industrial water treatment (e.g., cooling water systems) and daily chemical production (e.g., cosmetics, detergents). It monitors ATP in production water and equipment surfaces to prevent microbial growth and ensure product quality stability.
7. Accessories and Consumables Configuration
1. Standard Accessories
◦ 1 HM-ATP ATP fluorescence detector host
◦ 1 aluminum alloy carrying case (for instrument storage and transportation)
◦ 1 dedicated software driver USB flash drive (contains driver program and data analysis software)
◦ 1 miniUSB PC data cable (for data transmission between instrument and PC)
◦ 1 Chinese operation manual (details instrument functions, operation steps, and maintenance)
◦ 1 rechargeable lithium battery (built into the instrument, no separate replacement required)
◦ 1 battery charger (matches the built-in lithium battery for charging)
1. Consumables
◦ Integrated wetted collection swabs (containing stable liquid luciferase; stored at 0-4℃ refrigeration, valid for 3 months; frozen storage valid for 1 year)
◦ Lens cleaning paper (for cleaning the instrument's touchscreen and photoelectric sensor lens)
◦ Lens cleaning solution (non-corrosive, used with cleaning paper to remove stubborn stains)
8. Model Comparison and Selection Suggestions
1. Model Comparison: Currently, Hengmei Intelligent Manufacturing's ATP fluorescence detector product line mainly includes the HM-ATP model, which integrates all core functions (high-sensitivity detection, coliform screening, intelligent qualification judgment, data upload) and is compatible with multiple application scenarios. There are no other models in the same series for the time being. The HM-ATP model has a balanced configuration, meeting the basic and advanced needs of most industries, avoiding the need for users to choose between multiple models with fragmented functions.
2. Selection Suggestions: The HM-ATP model is suitable for most users requiring on-site rapid ATP detection:
◦ Food Processing and Catering Users: It can be used for daily hygiene monitoring of equipment, staff, and raw materials, with fast detection speed (15 seconds) and automatic qualification judgment, helping to improve hygiene management efficiency.
◦ Medical and Pharmaceutical Users: Its high detection accuracy (1×10⁻¹⁸mol ATP) and built-in self-calibration function meet the strict hygiene requirements of medical environments and pharmaceutical cleanrooms, ensuring reliable disinfection effect assessment.
◦ Law Enforcement and Supervision Users: The portable design (lightweight, long standby time) and data upload function are suitable for on-site inspections without fixed laboratories, supporting real-time data recording and law enforcement evidence collection.
◦ Environmental and Water Quality Users: The coliform screening mode and stable reagent performance enable rapid assessment of water microbial pollution, suitable for field water sample detection.
9. Instrument Installation Steps
1. Unpacking and Inspection: Open the aluminum alloy carrying case, take out the HM-ATP host, miniUSB data cable, software driver USB flash drive, charger, and Chinese operation manual. Check whether each accessory is complete and intact; confirm that the instrument host has no scratches or damage, and the touchscreen is free of cracks.
2. Battery Charging: Connect the charger to a 220V AC power supply, insert the other end into the instrument's charging port (side panel). The charging indicator light turns red during charging and green when fully charged (charging time is about 2-3 hours). Disconnect the charger after full charging.
3. Software Driver Installation: Insert the dedicated software driver USB flash drive into the PC's USB port. Open the USB flash drive, run the "Driver Installation.exe" program, and follow the installation wizard to complete the driver and data analysis software installation. Restart the PC after installation to ensure the software takes effect.
4. Data Cable Connection (Optional): For users needing data upload, connect one end of the miniUSB data cable to the instrument's miniUSB interface and the other end to the PC's USB port. Open the data analysis software on the PC; the software will automatically recognize the instrument (if not recognized, recheck the driver installation or cable connection).
5. Power-On Self-Test: Press the instrument's power button (side panel) to turn it on. The instrument will automatically start a 30-second self-test, during which the touchscreen displays "Self-Checking..." and the built-in self-calibration light source runs. After successful self-test, the instrument enters the main interface (displaying "Detection", "History", "Settings" options), indicating that the installation is complete.
10. Instrument Use and Operation Steps
1. System Parameter Setting: On the main interface, click the "Settings" option to enter the parameter setting interface:
◦ Limit Setting: Click "Upper Limit" and "Lower Limit" to input RLU values (e.g., set lower limit = 100 RLU, upper limit = 500 RLU) according to hygiene standards; the instrument will judge "Qualified" (RLU < lower limit), "To Be Observed" (lower limit ≤ RLU ≤ upper limit), or "Unqualified" (RLU > upper limit) based on detection results.
◦ Time Setting: Adjust the instrument's system time to ensure the timestamp of detection data is accurate.
◦ Detection Mode: Select "RLU Measurement" (for general ATP detection) or "Coliform Screening" (for coliform-specific detection).
◦ After setting, click "Save" to return to the main interface.
1. Swab Preparation: Take the integrated wetted collection swab from refrigerated storage (0-4℃) and let it stand at room temperature for 20-30 minutes to activate the reagent; alternatively, warm the upper part of the swab capsule with the palm for 5 minutes to speed up activation. Do not expose the swab to air for an extended period to avoid reagent degradation.
2. Sample Collection: Remove the swab from its sheath, hold the swab connector with one hand, and wipe the sample surface at a 45° angle (covering a 10×10 cm area for surface samples) to ensure sufficient sample collection. For liquid samples, immerse the entire swab head in the liquid for 1-2 seconds and quickly retrieve it.
3. Reagent Reaction: Insert the swab back into its sheath and seal it tightly. Hold the swab connector with one hand and the upper capsule with the other, and bend back and forth until the reagent valve breaks. Squeeze the swab head three times to ensure all liquid reagent is released, then flick the swab downward five times to mix the sample and reagent thoroughly.
4. Detection Execution: Insert the prepared swab into the instrument's swab insertion port (top). On the main interface, click the "Detection" option; the instrument will start measuring and display "Detecting..." on the screen. After 15 seconds, the measured RLU value and qualification judgment result (e.g., "Qualified", "Unqualified") will be displayed.
5. Data Management:
◦ Data Storage: Click the "Save" button on the detection result interface to store the data (including RLU value, time, and qualification result) in the instrument's internal memory.
◦ Data Upload: Connect the instrument to a PC via the miniUSB cable, open the data analysis software, click "Upload Data", and select the records to upload for further analysis or report generation.
◦ Data Query: Click the "History" option on the main interface to view stored detection records, supporting query by date or RLU range.
1. Instrument Shutdown: After detection, remove the swab from the insertion port and dispose of it properly. Press the power button to turn off the instrument, cover the swab insertion port with the dust-proof cap, and place the instrument and accessories back into the aluminum alloy carrying case for storage.
11. Sample Detection Steps
1. Sample Preparation: Confirm the sample type (surface or liquid) and select the corresponding integrated wetted collection swab. For surface samples (e.g., food processing equipment, medical device surfaces), ensure the sample surface is free of obvious debris (wipe gently with a clean cloth if necessary); for liquid samples (e.g., drinking water, wastewater), collect the sample in a clean container to avoid external contamination.
2. Swab Activation: Take the swab from refrigerated storage and activate it (stand at room temperature for 20-30 minutes or warm with palm for 5 minutes). Check the swab's expiration date to ensure the reagent is valid.
3. Sample Collection:
◦ Surface Samples: Remove the swab from its sheath, hold the connector, and wipe the sample surface at a 45° angle. Use a back-and-forth wiping motion to cover a 10×10 cm area, applying moderate pressure to ensure the swab head fully contacts the surface and collects sufficient biological residues.
◦ Liquid Samples: Remove the swab from its sheath, immerse the entire swab head in the liquid sample for 1-2 seconds, then quickly retrieve it. Avoid dripping excess liquid to prevent reagent dilution.
1. Reagent Mixing: Insert the swab back into the sheath and seal tightly. Bend the swab's reagent valve until it breaks (a "click" sound indicates successful breaking). Squeeze the swab head three times with fingers to release all liquid reagent, then flick the swab downward five times to ensure the sample and reagent are fully mixed (mixing time ≥30 seconds to ensure complete reaction).
2. Instrument Detection: Insert the mixed swab into the instrument's swab insertion port. Power on the instrument (if not already on) and complete the 30-second self-test. Click "Detection" on the main interface; the instrument will start measuring the luminescence intensity. After 15 seconds, record the displayed RLU value and qualification judgment result.
3. Result Verification: For critical samples (e.g., pharmaceutical raw materials, sterile medical devices), repeat the detection 2-3 times to ensure result consistency. If the RLU values of repeated detections differ by more than 10%, recheck the swab activation, sample collection, and reagent mixing steps, then re-detect.
4. Result Analysis and Reporting: Use the data analysis software to upload the detection data to a PC. Generate a detection report (including sample information, detection time, RLU value, qualification result, and operator) and archive it. For unqualified samples, trace the source of contamination (e.g., equipment disinfection loopholes, staff operation errors) and take corrective measures (e.g., re-disinfection, staff training).
5. Post-Detection Cleaning: Dispose of the used swab in accordance with medical waste regulations. Wipe the instrument's touchscreen and swab insertion port with lens cleaning paper (dampened with a small amount of cleaning solution if needed) to remove residual reagent or contaminants. Store the instrument in a dry, cool environment (avoid direct sunlight and high humidity) to maintain its performance.
Article address:https://www.molecularbio.cn/news/67.html